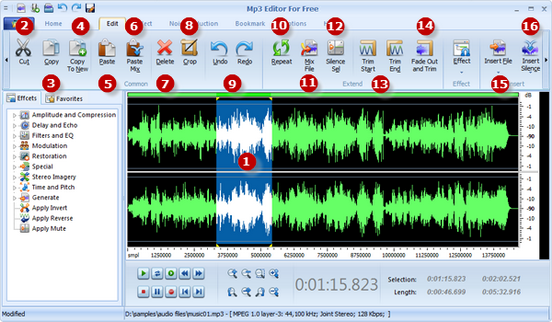
MP3 Editor for Free is multifunctional audio editing freeware. It’s completely charge-free and you can get a fully functional version through a free download without any fussy registration. With its easy and clean interface, MP3 Editor for Free is perfect for home-studio recording and for people just getting started with audio editing. It has dozens of audio effects, audio filters, and tools for converting audio files into formats including MP3, WMA, WAV, OGG Vorbis, VOX, audio CD tracks, etc. Its powerful recorder control would help you record any sound from your microphone or streaming audio from the Internet. Below are some easy editing operations that may be frequently used:

Step 1. Select Region
Many of the editing functions below apply to the selected region. Also there are many ways to select a region to edit:
Click the left button and drag along with the waveform to the place needed to be selected;
Click anywhere of the waveform as a start point and use hotkey like Shift+Home, Shift+End or Ctrl+A to select from start/end or select the whole waveform;
Specify the beginner & end of the session by moving the sliders below the waveform window;
At the lower right of the editor, input the start & end time or the length of time from current position to select a region (or you can press Ctrl+G to activate a window to specify the time).
Step 2. Cut (Ctrl+X)
To “cut” is to delete the selected region but to keep a copy on the clipboard so it can be “pasted” somewhere else. This is useful when moving parts of the audio around in the file.
Step 3. Copy (Ctrl+C)
To “copy” is to make a copy of the selected region to the clipboard so you can paste it in another location. This is useful if you want to duplicate a part of the audio and insert (or mix it) in another file.
Step 4. Copy to New
To make a copy of all or part of a track and save it as a new audio file.
Step 5. Paste (Ctrl+V)
Paste can only be used after you have used the Cut or Copy functions to take a selected region to the clipboard. The paste function replaces the current selected region (or inserts if there is no selection).
Step 6. Paste Mix
To paste (insert) the previously copied audio fragment which will be inserted right from the cursor position, overwriting the original audio and without changing its duration. For instance, if you have a three-minute file and paste a copied fragment of 20 seconds, the resulting audio will be still 3 minutes.
Step 7. Delete (Delete)
To remove the audio data that is currently selected without copying it to the clipboard.
Step 8. Crop (Ctrl+T)
With “Crop” you can select the part of an audio file you want and cut off the other parts.
Step 9. Undo (Ctrl+Z) & Redo (Shift+Ctrl+Z)
To Undo/Redo is to restore/repeat the file to its state before the previous edit function. To undo your last action press Ctrl+Z. To redo your last action press Shift+Ctrl+Z.
Step 10. Repeat
To make one or more copies of the selected region and insert them right after the selected region one by one.
Step 11. Mix File
To specify an audio file to mix it with the current selected region.
Step 12. Silence Selection
To mute the selected region. This function can be useful to remove breaths or clicks from a voice recording without changing the timing of the words.
Step 13. Trim Start & Trim End
To delete everything before (Trim Start) or after (Trim End) the current position.
Step 14. Fade out and Trim
A combined function which fades out over the selection then marks the end of the selection as the end of the file. This is frequently used at the end of music tracks.
Step 15. Insert File
To insert another audio file at the beginning, end or the current position of the waveform.
Step 16. Insert Silence
To insert silence of a specified duration at or over the selected location.
