How to Burn Data CD?

A data disc is a CD or DVD used to store electronic data, such as the files and applications that reside on your computer’s hard drive. Unlike audio CDs, data discs are used to store files that are readable only by a computer. Data discs cannot be played on your home or car stereo even if audio files are on the disc. A data DVD can typically hold up to 4.7 GB of information and can be read with any appropriate DVD drive. A data CD can hold up to 700 MB of information and can be accessed with any computer equipped with a CD-ROM drive or CD recorder.

Let’s say you got a lot of important data, personal information, business secrets, and photos with families… It will be tragic loss if they are ruined by accidental HDD damage. Except for digital backup, you should have a backup plan 2 – that is to burn these data to CD or DVD disc. A disc is also useful for distributing multimedia presentations, graphics, reports, and other business information with colleagues or customers.

 

Download Now – It’s Free


Step 1. Activate the data DVD/CD burner

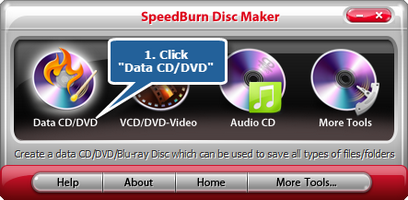
Insert a writable CD into your disc drive and launch SpeedBurn Disc Maker. Click “Data DVD/CD” to activate the data DVD/CD burner wizard.


Activate the data DVD/CD burner


Step 2. Select burning device

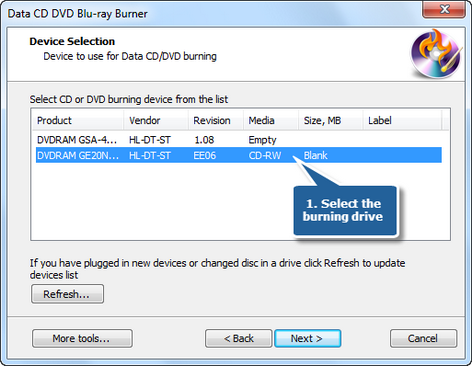
The burner scans your system and all the available drives are displayed in the list. Select the usable disc drivefrom the list (the system will select it by default if there is only one). If you plug in new devices or change the disc in the drive, click “Refresh” to update the device list.


Select burning device


Step 3. Choose file system

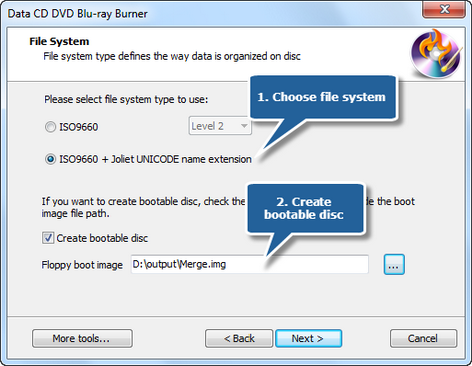
Choose a system type to use. We provide ISO-9660 level 1 & 2 and ISO-9660 + Joliet UNICODE name extension to choose. Then, you may choose to create bootable disc. Just check the “Create bootable disc” and click “Browser” to find and open the boot image files.


Choose file system


Step 4. Add files

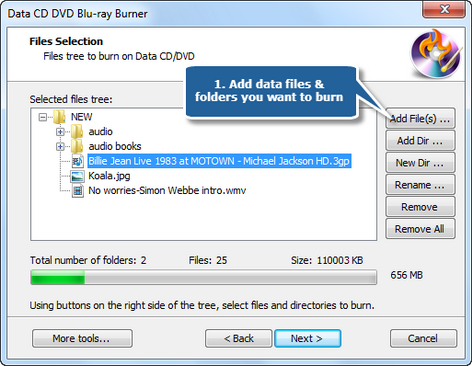
Click “Add File(s)…” & “Add Dir…” to add data files & folders you want to burn and use “New Dir…” or “Rename Dir…” to create or rename the folder. Click “Remove” or “Remove All” to delete one or all listed files. There are also information of file size and disc size.


Add files


Step 5. Choose burning mode and burning speed


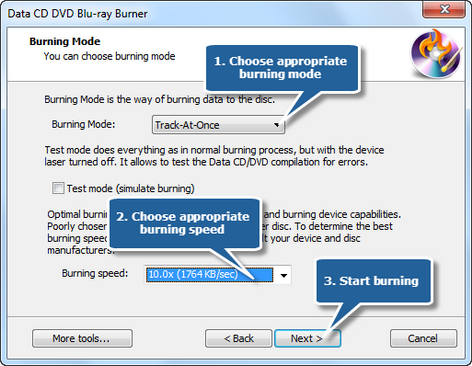
Select one burning mode from “Burning Mode” drop-down list (There are Track-AT-Once, Session Track-AT-Once, Disc-AT-Once PQ and Disc-AT-Once raw P-W). You may choose test mode to simulate burning for checking errors. Then, choose the appropriate burning speed (Burning speed depends on the capabilities of your system and your drive). You may choose “Send optimum power calibration” and “Create multisession disc”. Click “Next” to start burning and wait until the process bar reaches 100%. The disc will eject after the data CD/DVD has been completely burned.


5. Choose burning mode and burning speed