WMA, stands for Windows Media Audio, is a proprietary compressed audio file format developed by Microsoft, the maker of Windows Media Player. It is initially intended to be a competitor to the popular MP3 format. With the introduction of Apple’s iTunes Music Store, WMA has positioned itself as a competitor to the Advanced Audio Coding (AAC) format used by Apple and is part of Microsoft’s Windows Media framework. Encapsulated in an ASF container, WMA has one ability that seems to attract more and more businesses and allows this format to stick around. That’s the easy inclusion of DRM or Digital Rights Management directly into the WMA file.
MP3 format, short for MPEG-1 Audio Layer 3, a revolutionary digital audio format, is developed by Fraunhofer-Gesellschaft and Thompson Multimedia in the late 1980s and brought to the mainstream through the Internet in 1997. It is a common audio format for consumer audio storage, as well as a standard encoding for the transfer and playback of music on digital audio players. MP3 is a near-CD quality file format for sound files and is very popular for music on the web. As an audio-specific format, MP3 becomes more popular when people use it to swap music online because of its powerful compression.
Although WMA is widely used nowadays and supported by a vast majority of players, MP3 is still more popular as it can be played on almost all media devices. SoundTurn Audio Converter allows the WMA to MP3 conversion with top quality and speed. The wizard style operation and easy quality settings make audio conversion a piece of cake.
Step 1. Add audio files to the conversion list
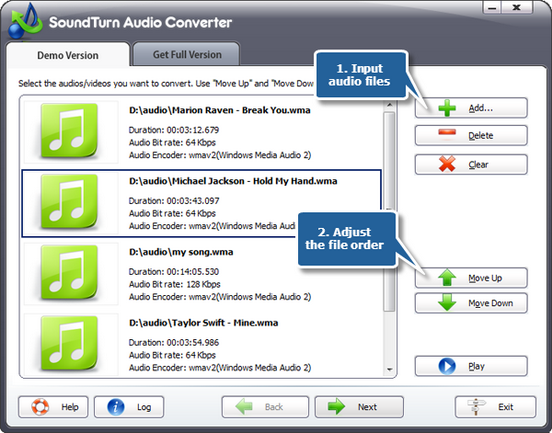
Launch SoundTurn Audio Converter. Click “Add…” button to input audio files from your computer to the conversion list. You are allowed to remove one or all of added audio files by “Delete” or “Clear” button. “Move Up/Down”button is used to arrange the sequences & you can also drag the listed files to change the order. There’s a “Play”button to play the selected file with the media player in your system.

Step 2. Specify output settings
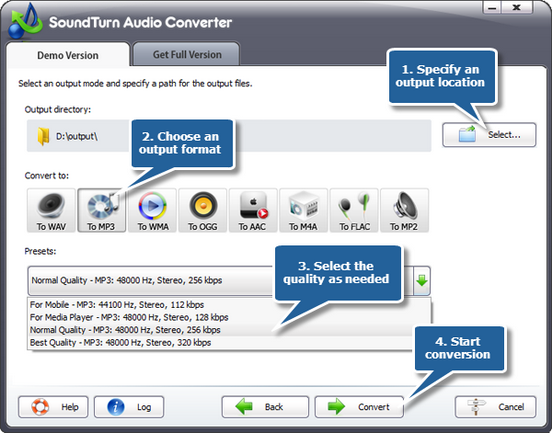
Click “Select…” to choose output folder to backup the output files. Then you must choose “To MP3” an output format among WAV, MP3, WMA, OGG, AAC, M4A, FLAC and MP2. For professional or casual use, you can choose an output quality preset from the “Presets” dropdown list, in which many well-configured quality presets for every format are supplied, to meet your specific needs. Click “Convert” to start conversion.

Step 3. Start conversion
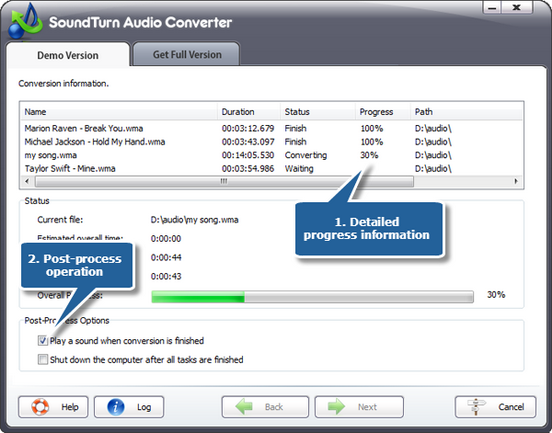
After you hit “Convert”, within few seconds, you can see the some conversion info and a progress bar. You can choose to play a sound or shut down the computer when conversion is finished.

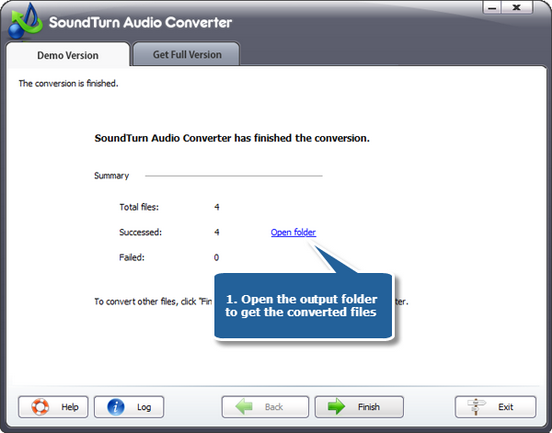
A brief report will be displayed after conversion is finished. Click the “Open folder” to directly open the output folder in case you don’t know where your output file is saved. Now, enjoy the MP3 files on your MP3 player!

