AVI, which stands for Audio Video Interleave, is a Container format used byMicrosoft’s Video for Windows multimedia framework. Since it was developed for Windows 3.1 in 1992, it lacks some features found in newer containers like MPEG or MP4, but is still widely used by consumers and even supported by some standalone DVD players. AVI combines audio and video into a single file in a standard container to allow simultaneous playback. It’s advantage is it’s simple architecture, due to which AVI runs on a number of different systems like Windows, Mac’s, Linux, Unix and is supported by all most popular web-browsers.
MP4, a container format that can combine different multimedia tracks into a single file, was developed by MPEG (Motion Pictures Experts Group), an international organization that develops and manages publishing standards for digital audio and video. MP4 files support text and graphics. More advanced MP4 files will contain streams for 2D and 3D animation and user interactivity (such as DVD menus) MPEG-4, the video compression standard behind MP4 files, is an open standard that is publicly available for developing software or hardware. All files encoded in an MPEG-4 standard are associated with the extension “.mp4”.
All too often, we need to convert some AVI files in hand to MP4 videos to enjoy them on iPad, iPod, PSP and many other MP4 devices. OneClick Video Switch enables you to convert AVI to MP4 for more mobile fun!
Step 1. Add video files to conversion list
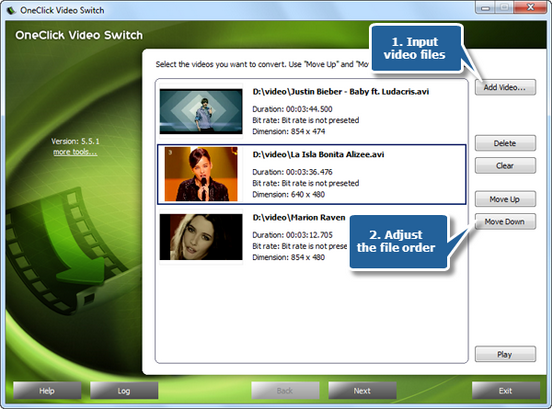
Launch OneClick Video Switch. Click “Add Video…” to input video files on your computer to the window. Multiples files can be added to be processed in a batch. The detailed information of the added files can be viewed. You are allowed to use“Delete” or “Clear” to remove the unwanted task and “Move Up/Move Down” to arrange the order according to your schedule. There’s a “Play” button to play the selected file with the media player in your system.

Step 2. Specify output settings
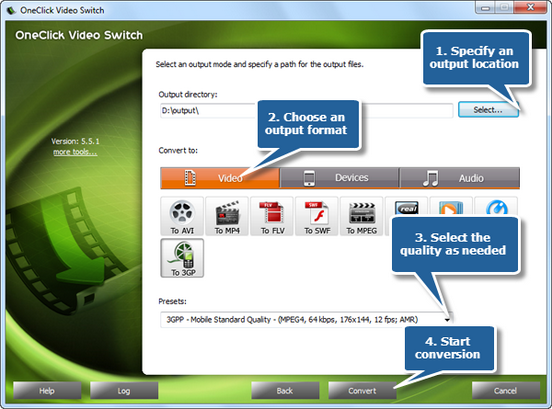
Click “Select…” to choose output folder. There are 3 tabs “Video”, “Devices” & “Audio”, containing various supported formats. Click “Video” tab and choose “To MP4” as an output format. There are also many well-configured quality presets for every format in the “Presets” list to meet your specific needs. Hit “Convert” to start conversion.

Step 3. Start conversion
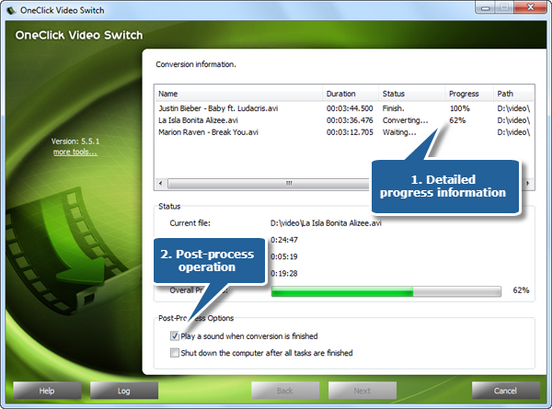
After you hit “Convert”, within few seconds, you can see the some conversion info and a progress bar. There are also post-process options to choose (Auto play a sound or shutdown the computer after conversion).

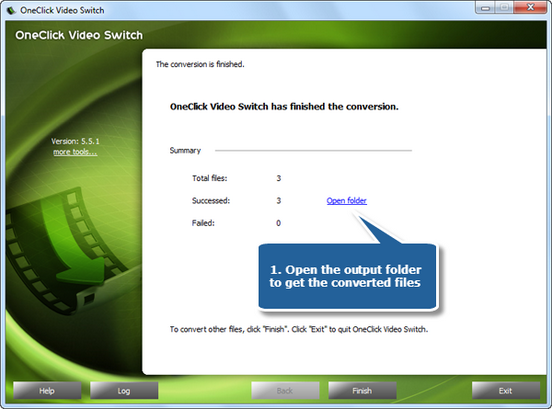
A brief report will be displayed after conversion is finished. Click the “Open folder” to directly open the output folder in case you don’t know where your output file is saved. Now, enjoy the converted videos on MP4 player!

