The iPhone is a line of internet and multimedia-enabled smartphone designed and marketed by Apple and originally released in 2007. Its functions are similar to a camera phone, a portable media player and an internet client. iPhone combines an iPod music/video player, a cell phone, an internet web and email client, and a handheld application platform into one device. iPhone is intended to compete in the“smartphone” market. As of July 2009, iPhone has up to 32 GB of storage for music, movies, podcasts, and applications. iPhone has had varying storage capacities ranging from 4 GB (original iPhone, 2007) to 32 GB (iPhone 3GS, June 2009). Some of the iPhone’s storage is used for the operating system and for optional third-party applications (available from the App Store), so not all of this space is available to store songs and videos.
Although ringtones are readily available for purchase through Apple’s iTunes store, it is also possible to create ringtones using any unprotected audio file. iTunes files cannot be made into ringtones without defeating the license unless they are downloaded as ringtones. In fact with EarCatch Ringtone Express, you just need a little practice to get unique ringtones to express your personality.
Step 1. Add audio files
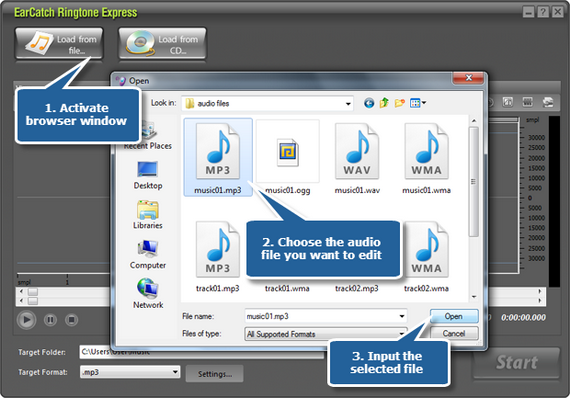
Launch EarCatch Ringtone Express. Click “Load from file” and select an audio file from your computer to input. It also allows you to input audio files by clicking “Load from CD” to input audio tracks from an audio CD. The file will be displayed in the waveform window.
Step 2. Edit selection
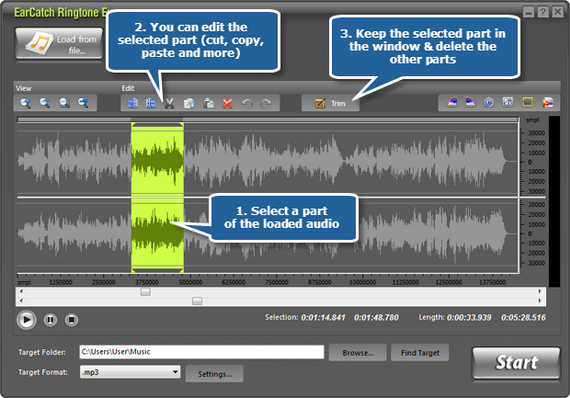
Select a part to edit as ringtone with basic editing functions (cut, copy, paste, trim, etc.) and add audio effects as needed. You can zoom the waveform by the zoom buttons or your mouse wheel.
(4 ways to select the portion: Drag your mouse with left button down along the waveform until the point where you desire to select a session of the file; Move the sliders below the waveform window to select a part; Enter the specific starting/ending time in the “Selection” area; Click on the waveform to set the starting point and enter the duration time of the selection as needed in the “Length”area.)
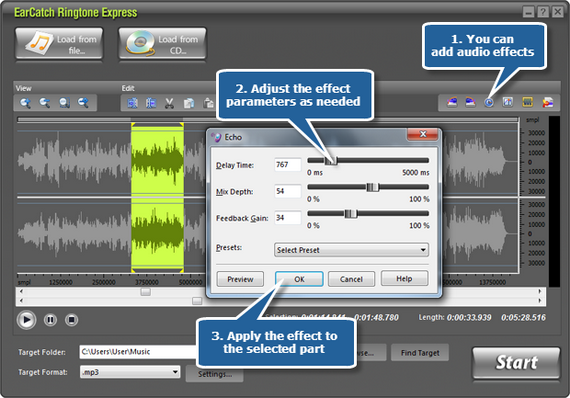
It is available to add some effects like echo, fade-in & fade-out as well as adjust the volume of the portion. You also have the power to pre-listen the selected part by clicking on the play button.
Step 3. Output as iPhone ringtone
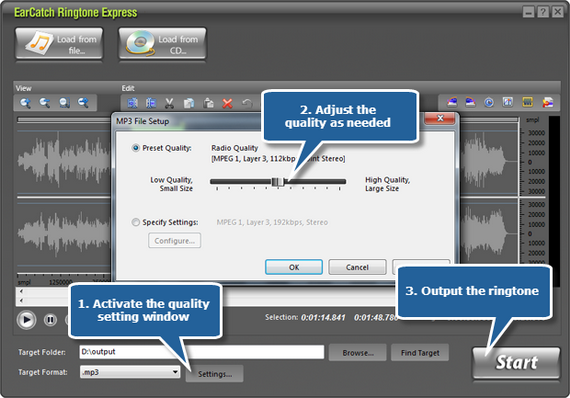
Click “Browse” to specify an output folder to save the output files and choose an output format from the dropdown menu of “Target Format” (MP3, WAV, WMA and OGG are supported).
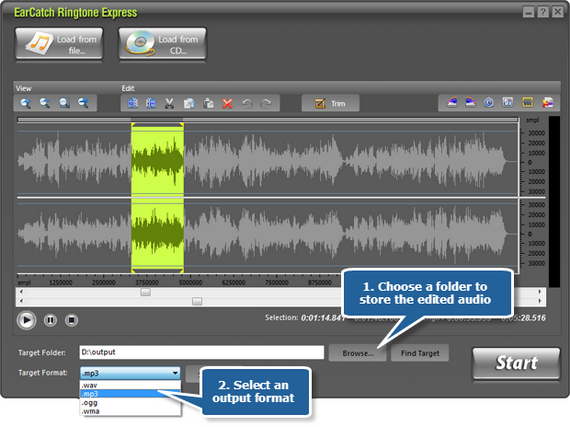
You can click “Settings” to use the well-configured quality presets or specify the configuration parameters to adjust the output quality. Then, click “Start” to output. When the processing window disappears, the ringtone creation is finished. The “Find Target” button helps you directly open the output location in case that you forgot where it is saved. Now, you can transfer the DIY ringtone to your iPhone.
